quick step laminaat
How to Install Quick Step Laminate Flooring Planks
Quick Step laminaat is a popular choice for homeowners looking for a durable and stylish flooring option. With its easy installation process, it has become a favorite among DIY enthusiasts. In this guide, we will walk you through the steps of installing Quick Step laminate flooring planks, providing expert knowledge and tips to help you achieve a professional finish.
Table of Contents
- Introduction
- Preparation
- Tools and Materials
- Choosing the Right Underlayment
- Acclimating the Laminate Flooring
- Preparing the Subfloor
- Installing the Laminate Flooring
- Trimming and Finishing
- Maintenance and Care
- Questions and Answers
- Conclusion
Preparation
Prior to installing Quick Step laminate flooring planks, it is important to prepare the area where the flooring will be installed. This includes removing any existing flooring, ensuring a clean and level subfloor, and gathering the necessary tools and materials.
Tools and Materials
To install Quick Step laminate flooring planks, you will need the following tools and materials:
- Laminate flooring planks
- Underlayment
- Tape measure
- Pencil
- Utility knife
- Table saw or circular saw
- Spacers
- Hammer
- Tapping block
- Pry bar
- Finishing nails
- Trim
- Installation kit (includes tapping block, pull bar, and spacers)
- Cleaner for laminate flooring
Choosing the Right Underlayment
An underlayment is a crucial component of laminate flooring installation. It provides sound insulation, moisture protection, and helps to even out minor subfloor imperfections. When selecting an underlayment for your Quick Step laminate flooring, consider factors such as noise reduction, moisture resistance, and compatibility with the specific flooring product.
Quick Step offers a range of underlayment options specifically designed for their laminate flooring products. It is recommended to choose an underlayment that matches the needs of your installation environment, ensuring optimal performance and longevity of your flooring.
Acclimating the Laminate Flooring
Prior to installation, it is important to acclimate the Quick Step laminate flooring planks to the room where they will be installed. This allows the planks to adjust to the temperature and humidity of the space, minimizing the risk of expansion or contraction after installation.
To acclimate the flooring, follow these steps:
- Remove the planks from their packaging and lay them flat in the room where they will be installed.
- Leave the planks to acclimate for at least 48 hours, ensuring the room temperature is between 60-80°F (15-27°C) and the humidity level is within the manufacturer’s recommendations.
- During acclimation, keep the planks at least 12 inches away from the walls to allow for air circulation.
Preparing the Subfloor
Before installing the Quick Step laminate flooring, it is important to ensure that the subfloor is clean, dry, and level. Any debris, dust, or unevenness can affect the installation and result in an unsatisfactory finish.
To prepare the subfloor, follow these steps:
- Remove any existing flooring, including carpet, vinyl, or tile. Ensure the subfloor is free from adhesive residue and any protruding nails or screws.
- Clean the subfloor thoroughly, removing any dirt, dust, or debris. Sweep or vacuum the area to ensure a clean surface.
- Inspect the subfloor for any unevenness or imperfections. Use a leveling compound or plywood underlayment to rectify any issues, ensuring a smooth and level surface.
- Once the subfloor is clean and level, install the chosen underlayment according to the manufacturer’s instructions. Ensure the underlayment is properly aligned and secured.
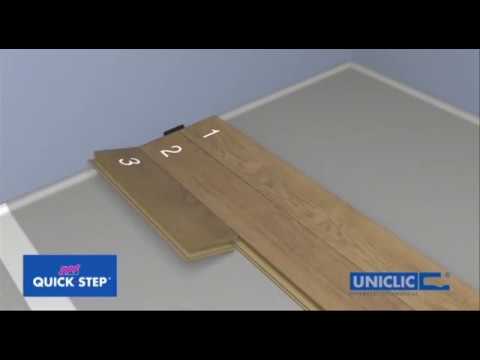
Installing the Laminate Flooring
Now that the preparation is complete, it’s time to install the Quick Step laminate flooring planks. Follow these steps for a successful installation:
- Start by laying the first row of planks along the longest wall in the room. Leave a 1/4-inch (6mm) expansion gap between the planks and the wall to allow for natural movement.
- Use spacers to maintain the expansion gap along the entire perimeter of the room.
- Install subsequent rows by clicking the planks together using the manufacturer’s locking system. Use a tapping block and hammer to ensure a tight fit.
- Stagger the end joints of the planks in adjacent rows, avoiding a repetitive pattern. This will create a more natural and visually appealing installation.
- Continue installing the planks row by row, ensuring they are securely locked together. Use the installation kit tools as necessary to assist with the process.
- Trim the last row of planks to fit using a table saw or circular saw. Leave another 1/4-inch (6mm) expansion gap between the planks and the wall.
- Install the final row, using a pry bar and tapping block if necessary to achieve a snug fit.
Trimming and Finishing
Once the Quick Step laminate flooring is fully installed, it’s time to add the finishing touches. This includes trimming the excess underlayment and installing trim pieces to cover the expansion gap.
Follow these steps for trimming and finishing:
- Carefully trim any excess underlayment using a utility knife or scissors.
- Install baseboards or quarter round trim along the perimeter of the room to cover the expansion gap. Use finishing nails to secure the trim to the wall, ensuring a clean and professional finish.
- Inspect the entire installation for any loose or damaged planks. If necessary, use the tapping block and hammer to reposition or replace any faulty planks.
Maintenance and Care
Quick Step laminate flooring is designed to be easy to maintain and care for. To keep your flooring looking its best, follow these tips:
- Sweep or vacuum the floor regularly to remove dirt and debris.
- Use a damp mop with a mild laminate floor cleaner to remove spills and stains.
- Avoid excessive water or liquid on the floor, as it can cause damage to the planks.
- Place protective pads under furniture legs to prevent scratches.
- Avoid dragging heavy objects across the floor, as it can cause scratches or dents.
Questions and Answers
1. Can Quick Step laminate flooring be installed in bathrooms?
While Quick Step laminate flooring is highly durable and moisture-resistant, it is not recommended for installation in bathrooms or other high-moisture areas. Extended exposure to moisture can damage the planks and compromise the integrity of the installation. It is best to choose a flooring option specifically designed for wet areas.
2. Can I install Quick Step laminate flooring over existing tile?
Yes, you can install Quick Step laminate flooring over existing tile. However, it is important to ensure that the tile is in good condition, clean, and level. Any loose or damaged tiles should be repaired or replaced before installation. Additionally, it is recommended to use an underlayment to provide a smooth surface for the laminate flooring.
3. Can I install Quick Step laminate flooring on stairs?
Quick Step laminate flooring is not recommended for installation on stairs. Stairs require a specialized installation method and specific stair nosing profiles for safety and durability. It is best to consult a professional for installing laminate flooring on stairs.
4. Can I use a steam mop to clean Quick Step laminate flooring?
No, it is not recommended to use a steam mop on Quick Step laminate flooring. The high heat and moisture generated by steam mops can damage the planks and cause them to warp or buckle. It is best to use a damp mop with a mild laminate floor cleaner for regular cleaning.
5. Can I install Quick Step laminate flooring over radiant floor heating?
Yes, Quick Step laminate flooring can be installed over radiant floor heating systems. However, it is important to follow the manufacturer’s guidelines for temperature limits and installation methods. The radiant heating system should be properly installed and operational before laying the laminate flooring.
Conclusion
Installing Quick Step laminate flooring planks is a straightforward process that can be accomplished by DIY enthusiasts with some basic tools and knowledge. By following the steps outlined in this guide, you can achieve a flawless installation and enjoy the durability and beauty of Quick Step laminate flooring. Remember to properly prepare the subfloor, choose the right underlayment, and follow the manufacturer’s instructions for acclimation and installation. With proper care and maintenance, your Quick Step laminate flooring will provide years of enjoyment and enhance the aesthetic appeal of your home.
Een Quick-Step vloer plaatsen is kinderspel, dankzij de bejubelde, gepatenteerde Uniclic en Uniclic Multifit kliksystemen.