plavuizen
How to Tile a Floor or Wall: A Beginner’s Guide to Plavuizen
Are you considering tiling your floor or wall with plavuizen? Plavuizen, also known as Dutch tiles, are a popular choice for their durability, timeless beauty, and easy maintenance. Whether you’re a DIY enthusiast or a homeowner looking to refresh your space, this guide will provide you with the necessary knowledge and expertise to tackle your tiling project with confidence.
Table of Contents
- Introduction to Plavuizen
- Choosing the Right Plavuizen
- Gathering the Tools and Materials
- Preparing the Surface
- Installing Plavuizen
- Grouting and Sealing
- Maintaining and Caring for Plavuizen
- Questions and Answers
- Conclusion
Introduction to Plavuizen
Plavuizen are traditional Dutch tiles that have been used for centuries to create stunning floors and walls. These tiles are typically made from natural materials, such as clay or stone, and come in a variety of sizes, shapes, and colors. Plavuizen are known for their durability, making them an excellent choice for high-traffic areas like kitchens and entryways.
Not only are plavuizen functional, but they also add a touch of elegance and charm to any space. Their timeless appeal can complement both modern and traditional interior design styles. Whether you’re aiming for a rustic farmhouse look or a sleek contemporary feel, plavuizen can help you achieve your desired aesthetic.
Before diving into the tiling process, it’s important to consider factors such as the size of the area to be tiled, the design pattern you want to create, and your overall budget. By planning ahead, you can ensure a smooth and successful tiling project.
Choosing the Right Plavuizen
When selecting plavuizen for your project, there are several factors to consider. First and foremost, determine the desired size and shape of the tiles. Plavuizen come in various dimensions, including square, rectangular, and hexagonal. Consider the size of your space and the overall design aesthetic you want to achieve.
Additionally, take into account the color and finish of the tiles. Plavuizen are available in a wide range of hues, from earthy tones to vibrant colors. Consider the existing color palette of your room and choose plavuizen that harmonize with your overall design scheme.
Another consideration is the material of the plavuizen. Clay tiles offer a rustic, traditional look, while stone tiles provide a more natural and organic feel. Each material has its own unique characteristics and maintenance requirements, so choose the one that best suits your preferences and lifestyle.
Lastly, don’t forget to calculate the quantity of plavuizen needed for your project. Measure the area accurately and account for any cuts or wastage. It’s always a good idea to purchase slightly more tiles than required to have some spares in case of future repairs or replacements.
Gathering the Tools and Materials
Before starting your tiling project, it’s essential to gather all the necessary tools and materials. Having everything ready will ensure a smoother and more efficient installation process. Here is a list of the basic tools and materials you’ll need:
- Plavuizen tiles
- Tile adhesive
- Trowel
- Tile spacers
- Tile cutter or wet saw
- Grout
- Grout float
- Sponge
- Sealer
- Protective gloves and goggles
- Level
- Measuring tape
- Notched trowel
- Bucket
- Clean rags or towels
Make sure to choose high-quality tools and materials to achieve the best results. Investing in good-quality tile adhesive, grout, and sealer will ensure the longevity and durability of your tiled surface.
Preparing the Surface
Proper surface preparation is crucial for a successful tiling project. The surface on which you’ll be installing the plavuizen should be clean, dry, and level. Follow these steps to prepare the surface:
- Remove any existing flooring or wall coverings, ensuring a clean and smooth base.
- Repair any cracks or uneven areas on the surface. Fill them with an appropriate patching compound and allow it to dry completely.
- Clean the surface thoroughly to remove any dust, dirt, or grease. Use a degreasing cleaner for stubborn stains.
- Inspect the surface for moisture. If the surface is damp or prone to moisture, consider applying a waterproofing membrane to prevent future issues.
- Mark a starting point on the surface using a chalk line or a straightedge. This will serve as your guide when laying the tiles.
Once the surface is properly prepared, you’re ready to move on to the next step: installing the plavuizen.
Installing Plavuizen
The installation process for plavuizen involves several steps, each crucial for a successful outcome. Follow these steps to ensure a professional-looking installation:
- Start by applying a layer of tile adhesive to a small area of the surface using a notched trowel.
- Place the first tile at the starting point and press it firmly into the adhesive. Use tile spacers to maintain consistent spacing between tiles.
- Continue applying adhesive and laying tiles, working in small sections at a time.
- Use a tile cutter or wet saw to make any necessary cuts around edges, corners, or obstacles.
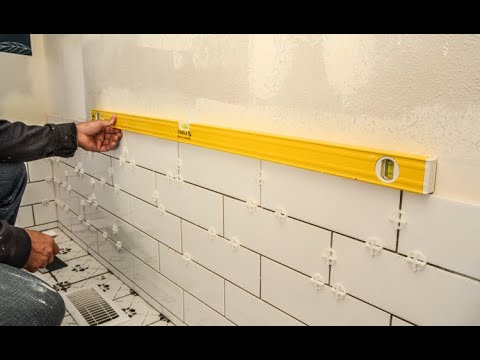
- Ensure that the tiles are level and aligned by using a level and adjusting them as needed.
- Allow the adhesive to dry according to the manufacturer’s instructions before proceeding to the next step.
Once the adhesive is completely dry, you’re ready to move on to grouting and sealing.
Grouting and Sealing
Grouting is the process of filling the gaps between tiles with grout, which not only enhances the appearance of the tiled surface but also ensures the stability and durability of the tiles. Follow these steps to grout your plavuizen:
- Mix the grout according to the manufacturer’s instructions, ensuring a smooth and lump-free consistency.
- Apply the grout to the gaps between the tiles using a grout float, pressing it firmly into the joints.
- Remove any excess grout from the tiles’ surface using a damp sponge in a diagonal motion.
- Allow the grout to dry for the recommended time, typically 24 to 48 hours.
After the grout has dried, it’s important to seal your plavuizen to protect them from stains and moisture. Select a suitable sealer based on the type of plavuizen you’ve installed and follow the manufacturer’s instructions for application.
Maintaining and Caring for Plavuizen
Plavuizen are relatively low-maintenance, but regular cleaning and care will help keep them looking their best for years to come. Here are some tips for maintaining and caring for your plavuizen:
- Regularly sweep or vacuum the tiled surface to remove dirt and debris.
- Wipe up spills immediately to prevent staining.
- Clean the tiles periodically using a mild detergent and warm water. Avoid harsh cleaners that could damage the tiles.
- Consider applying a sealer periodically to maintain the tiles’ protective layer.
- Avoid using abrasive cleaners or tools that could scratch the tiles’ surface.
By following these simple maintenance practices, you can ensure the longevity and beauty of your plavuizen for years to come.
Questions and Answers
Q: Can I install plavuizen over existing tiles?
A: Yes, it is possible to install plavuizen over existing tiles. However, there are some important considerations to keep in mind. The existing tiles must be in good condition, clean, and firmly adhered to the surface. It’s also crucial to ensure that the additional layer of plavuizen won’t cause any issues with door clearances, transitions, or overall floor height. Consult with a professional if you’re unsure about the feasibility of installing plavuizen over existing tiles.
Q: How long does it take for the adhesive to dry?
A: The drying time of tile adhesive can vary depending on factors such as temperature, humidity, and the specific product used. It’s essential to follow the manufacturer’s instructions regarding drying time. In general, tile adhesive can take anywhere from 24 to 72 hours to dry completely. Avoid walking on the newly tiled surface until the adhesive is fully cured to prevent any damage or displacement of the tiles.
Q: Can I install plavuizen on a wooden subfloor?
A: Yes, it is possible to install plavuizen on a wooden subfloor. However, additional preparation steps may be required to ensure a stable and long-lasting installation. The wooden subfloor should be sturdy, level, and free from any moisture or rot. It’s advisable to use a cement-based backer board or an uncoupling membrane to provide a stable surface for the plavuizen. Consult with a professional or follow the manufacturer’s instructions for the specific installation method on wooden subfloors.
Conclusion
Tiling a floor or wall with plavuizen can transform your space, adding beauty, durability, and a touch of timeless elegance. By following the steps outlined in this beginner’s guide, you’ll gain the necessary knowledge and expertise to successfully complete your tiling project. From choosing the right plavuizen to proper installation, grouting, and maintenance, every step is crucial for achieving a professional-looking result. Remember to plan ahead, gather the necessary tools and materials, and take your time to ensure a smooth and enjoyable tiling experience. With a little patience and attention to detail, you’ll be proud of your beautifully tiled floor or wall for years to come.
A beginner’s guide to tiling. Intimidated by tiling? It might be more approachable than you think. More details and a full list of …