vinyl vloer
How to Install Vinyl Plank Flooring as a Beginner | Home Renovation
Are you a beginner looking to renovate your home and install vinyl plank flooring? Look no further! In this comprehensive guide, we will walk you through the process of installing vinyl plank flooring step-by-step. Whether you are a DIY enthusiast or simply looking to save money on professional installation, this guide will provide you with all the necessary information and expert tips to help you achieve stunning results.
Vinyl plank flooring, also known as vinyl vloer, has gained popularity over the years due to its durability, affordability, and wide range of design options. It is an excellent choice for any room in your home, including kitchens, bathrooms, and basements. With its easy installation process, even beginners can achieve professional-looking results.
Table of Contents
- Introduction to Vinyl Plank Flooring
- Preparing for Installation
- Acclimating the Vinyl Planks
- Installing the Underlayment
- Laying the Vinyl Planks
- Trimming and Finishing Touches
- Maintenance and Care
- Frequently Asked Questions
- Conclusion
Introduction to Vinyl Plank Flooring
Vinyl plank flooring is a versatile and cost-effective flooring option that provides the look and feel of hardwood without the high price tag. It is made from multiple layers, including a durable wear layer, a printed design layer, and a backing layer for stability. The planks are available in various sizes, textures, and colors, allowing you to find the perfect match for your space.
One of the major advantages of vinyl plank flooring is its water resistance. Unlike hardwood or laminate flooring, vinyl plank flooring can withstand moisture, making it an ideal choice for areas prone to spills or high humidity. Additionally, vinyl planks are easy to clean and maintain, requiring only regular sweeping and occasional mopping to keep them looking their best.
Preparing for Installation
Before you begin the installation process, it is important to properly prepare the area where you will be installing the vinyl plank flooring. Here are some essential steps to follow:
Gather the Necessary Tools
To ensure a smooth installation process, gather the following tools:
- Tape measure
- Pencil
- Straight edge
- Utility knife
- Tapping block
- Hammer or mallet
- Spacers
- Level
- Vinyl plank cutter (optional)
Prepare the Subfloor
Inspect the subfloor for any damage or unevenness. Ensure that the subfloor is clean, dry, and free of debris. Remove any existing flooring, including carpet, laminate, or vinyl, and repair any damaged areas. If the subfloor is uneven, use a self-leveling compound to create a smooth surface.
Acclimating the Vinyl Planks
Prior to installation, it is essential to acclimate the vinyl planks to the temperature and humidity conditions of the room. This step helps prevent the planks from expanding or contracting after installation. Follow these steps for proper acclimation:
Unbox and Stack the Planks
Remove the vinyl planks from their packaging and stack them in the room where they will be installed. Leave them to acclimate for at least 48 hours, following the manufacturer’s guidelines. Make sure the room temperature is within the recommended range.
Keep the Planks Flat and Upright
During acclimation, ensure that the planks are stacked flat and upright. This allows for proper air circulation and prevents warping or bending. Avoid placing heavy objects on top of the stacked planks.
Installing the Underlayment
An underlayment provides an additional layer of cushioning, insulation, and noise reduction. While not always necessary, it is recommended for optimal results. Follow these steps to install the underlayment:
Clean the Subfloor
Ensure that the subfloor is clean and free of debris. Remove any dust, dirt, or loose particles that could interfere with the underlayment installation.
Roll Out the Underlayment
Roll out the underlayment across the entire area where the vinyl plank flooring will be installed. Cut the underlayment to fit using a utility knife. Overlap the seams by a few inches and secure them with tape.
Secure the Underlayment
Use staples or adhesive to secure the underlayment to the subfloor. Follow the manufacturer’s instructions for the best method of attachment.
Laying the Vinyl Planks
Now that the preparation work is complete, it’s time to start laying the vinyl planks. Follow these steps for a successful installation:
Create a Starting Line
Using a straight edge and a pencil, create a straight starting line along the longest wall in the room. This line will serve as a guide for the first row of vinyl planks.
Measure and Cut the Planks
Measure the length of the wall and subtract the expansion gap width recommended by the manufacturer. Cut the first plank accordingly, ensuring that the cut end will be hidden by baseboards or trim. Use a vinyl plank cutter or a utility knife and a straight edge for precise cuts.
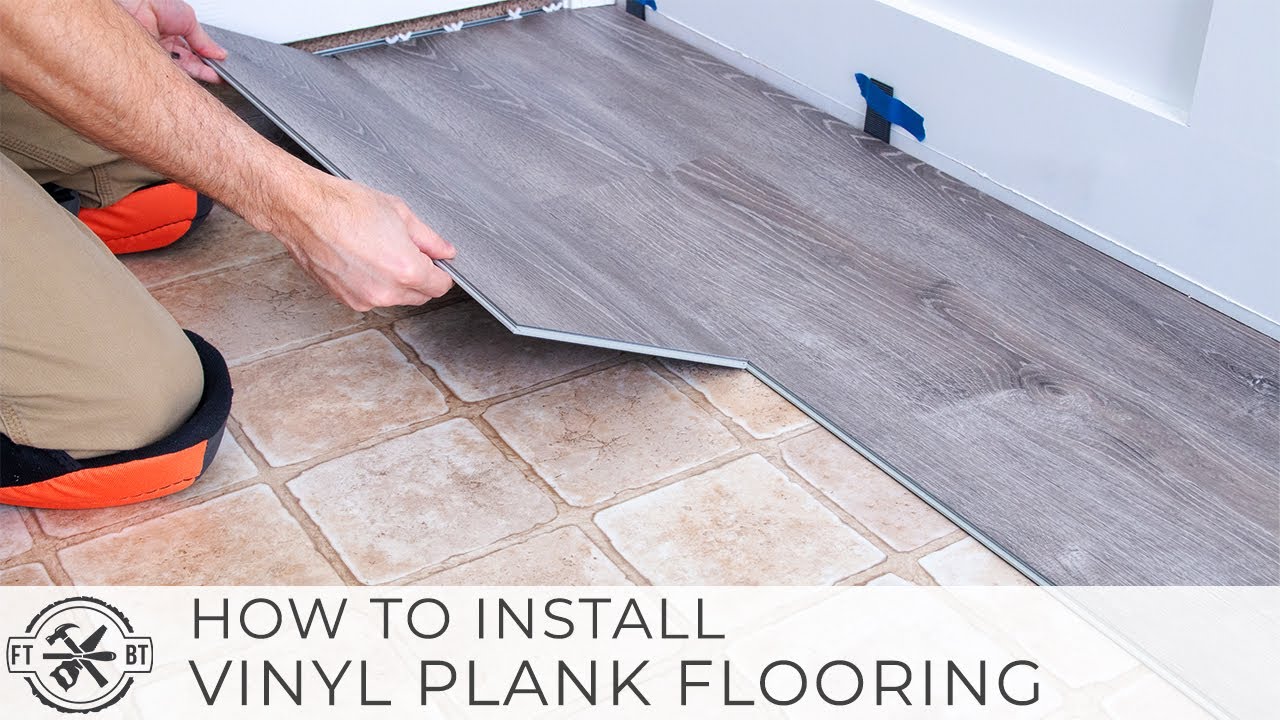
Install the First Row
Place the first plank along the starting line, with the tongue side facing the wall. Insert spacers between the plank and the wall to maintain the recommended expansion gap. Connect the next plank to the first by angling it and pressing the tongue into the groove. Continue installing the first row, ensuring a tight fit between the planks.
Continue with Subsequent Rows
For the second row and onward, cut the first plank to ensure staggered joints between rows. Connect the planks by angling and pressing them together, using a tapping block and hammer or mallet to ensure a secure fit. Use spacers to maintain the expansion gap along the walls.
Trim Around Doorways and Obstacles
When encountering doorways or obstacles, measure and cut the planks accordingly. Use a jigsaw or a coping saw to make precise cuts. Remember to leave the recommended expansion gap around door jambs to allow for movement.
Trimming and Finishing Touches
Once all the vinyl planks are installed, it’s time to add the finishing touches to achieve a professional look. Follow these steps:
Remove Spacers
After the installation is complete, remove the spacers from the expansion gaps. These gaps will be covered by baseboards or trim.
Install Baseboards or Trim
Install baseboards or trim along the walls to cover the expansion gaps and provide a finished appearance. Use a brad nailer or adhesive to secure the baseboards or trim in place.
Install Transition Strips
If transitioning between different flooring types, install transition strips to provide a smooth transition and protect the edges of the vinyl planks. Follow the manufacturer’s instructions for installation.
Maintenance and Care
To keep your vinyl plank flooring looking its best, follow these maintenance and care tips:
Sweep Regularly
Use a broom or a vacuum with a soft brush attachment to remove dust, dirt, and debris from the surface of the vinyl planks. Regular sweeping helps prevent scratches and keeps the flooring looking clean.
Mop Occasionally
For deeper cleaning, damp mop the vinyl plank flooring using a mild cleaner recommended by the manufacturer. Avoid using excessive water, as vinyl plank flooring is water-resistant but not waterproof.
Wipe up Spills Immediately
In case of spills, wipe them up immediately to prevent damage to the vinyl planks. Vinyl is resistant to stains, but prolonged exposure to certain substances can cause discoloration or damage.
Frequently Asked Questions
Can vinyl plank flooring be installed over existing flooring?
Yes, vinyl plank flooring can be installed over existing flooring, such as tile or hardwood, as long as the surface is clean, smooth, and in good condition. It is important to follow the manufacturer’s guidelines and ensure proper preparation before installation.
Is vinyl plank flooring suitable for bathrooms?
Yes, vinyl plank flooring is an excellent choice for bathrooms due to its water resistance. However, it is important to properly seal the edges and seams to prevent water infiltration and potential damage to the subfloor.
How long does vinyl plank flooring typically last?
Vinyl plank flooring is known for its durability and can last anywhere from 10 to 20 years, depending on the quality of the product and the level of foot traffic in the area. Proper maintenance and care can extend the lifespan of the flooring.
Conclusion
Installing vinyl plank flooring as a beginner may seem intimidating, but with the right knowledge and preparation, it can be a rewarding and cost-effective home renovation project. By following the step-by-step guide provided in this article, you will be able to achieve professional-looking results and enjoy the many benefits of vinyl vloer. Remember to properly prepare the area, acclimate the vinyl planks, and follow the recommended installation techniques. With proper maintenance and care, your vinyl plank flooring will provide years of durability and beauty for your home.
How to Install Vinyl Plank Flooring as a Beginner! See my flooring install playlist: http://bit.ly/2uFkWp6 Thanks to FilterBuy for …